Are you wondering how to integrate Shopify with WordPress? For WordPress beginners, it might seem difficult to turn your WordPress site into an online store, but it’s not. Starting an online shop is easier than ever before with Shopify and WordPress. Anyone can build a beautiful online shop in no time and start selling right away, without knowing a thing about code.
So, are you ready to build your own online store and start selling immediately?
In this article, we’ll show you how to integrate Shopify with WordPress, step-by-step.
That said, let’s get started with integrating Shopify and WordPress.
Why Integrate Shopify with WordPress?
WordPress offers several eCommerce plugins, like WooCommerce, to help you start an online shop.
Maybe you’re wondering why you should choose Shopify over the other eCommerce plugins? Below are a few advantages of using Shopify as your storefront:
- Ease of use : Getting started with Shopify is much easier than using native WordPress eCommerce plugins. All you have to do is sign up for an account with Shopify to get your eCommerce website up and running. You also don’t have to worry about site speed or security, because Shopify takes care of all of that for you.
- Reduced overhead: Shopify is a cloud-based solution, so you won’t experience traffic outages as your business grows. This means you don’t have to worry about running out of server resources and upgrading to more expensive WordPress hosting.
- Easy social media integration: Integrating your online store with social media is important for marketing your business and products. Shopify’s app store makes it easy. They have apps to integrate your Instagram feed on your Shopify site, add social media sharing buttons, and more. All you have to do is download the apps of your choosing, no coding required.
- Better shopping cart options: Shopify offers built-in payment options so you can instantly take payments from Visa, Mastercard, Discover, and American Express. They also offer multiple payment gateways like PayPal, and they’ll automatically calculate shipping rates and taxes for you so you can easily ship to anywhere in the world.
Who Should Use Shopify with WordPress?
Shopify is a good choice for online selling beginners and experienced sellers alike. But Shopify is especially great for beginners and startups because it’s a lot easier to use. Unlike WooCommerce, you don’t have to install anything and you can get started quickly.
They also have easy-to-understand pricing plans. Shopify’s basic plan starts at $39 per month. You don’t have to worry about spending too much money on eCommerce hosting plans and optimization for your online store. With their basic plan, you can minimize the risks of starting an online shop. And, as your online business grows, you can upgrade your plan and purchase Shopify apps to match your needs.
Shopify is the platform for you if you want a solution that’s completely hassle-free and is limitless in terms of scalability for your online shop.

However, Shopify limits the control you have over your website. WordPress gives you complete control over customization, backend files and database, use of APIs, custom coding, and more.
There’s a slight learning curve to it. But nowadays, there are tons of WordPress website builders like SeedProd, Elementor, and Divi that make it just as easy to create a stunning eCommerce site.
If you’d rather use WooCommerce with WordPress, check out our tutorial: How to Create an Online Store with WooCommerce- Step-by-Step.
Now in case you just one to sell a single product or a handful of products online, then you don’t need Shopify at all. You can use a form builder called WPForms that lets you create a stunning product catalog complete with automated email confirmations and notifications, and secure payment options.
You can embed the form catalog anywhere on your site and even display it inside popups using HTML coding.
Now, let’s dive into how to integrate Shopify with WordPress.
Set Up Shopify with WordPress – Step-by-Step
Integrating Shopify with your WordPress site is as easy as embedding the code snippet. Let’s take a look at the step-by-step guide below.
Step 0: Start a Website on WordPress
If you don’t already have a WordPress website, you’ll need to create one in order to start an online shop with Shopify. WordPress is the most popular content management system. It’s the best platform to start a website, online store, or blog. It comes with a number of built-in features that’ll help you easily build a website without having to know anything about code.
Plus, it’s an open-source platform. This means you’ll find tons of tools, plugins, and themes created by third party developers that will help you set up an amazing site.
There are a number of steps to starting a website on WordPress. First, you’ll need to pick a domain name for your business. A domain name, or URL, is your site’s address online.
Next, you’ll need to choose a website host. A web host is a business that provides the technologies and services a website needs to be viewed on the internet. It’s where your website files are stored. In other words, if your domain name is your address; your web hosting is your house.
We recommend using Bluehost to set up your online store. Bluehost is one of the best website hosting services available and they offer 1-click WordPress installation so you can create your eCommerce store super fast.

If you want more detailed instructions on how to start a website on WordPress, check out our tutorial on how to make a website – step-by-step.
We show you step by step how to install WordPress, choose from a selection of awesome WordPress themes, create a WordPress blog, and how to navigate the WordPress dashboard. We even reveal the must-have WordPress plugins and add-ons so that your site has the best functionality.
Once you’ve got a domain name, a web hosting, installed WordPress, and built your website, you’re ready to integrate Shopify and start selling.
Step 1: Set up a Shopify Store
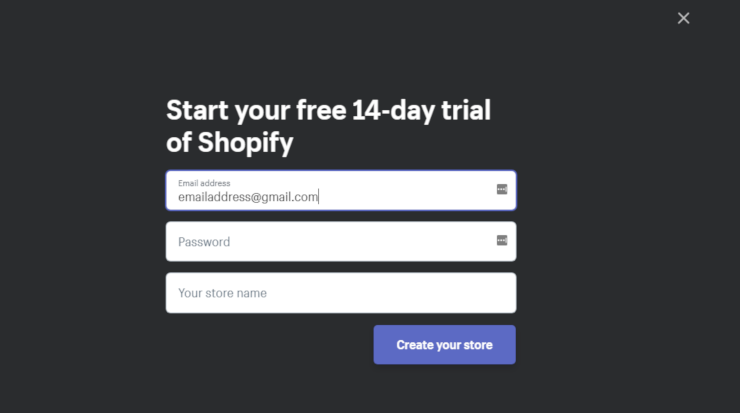
The first step to integrating Shopify with WordPress is to set up an account with Shopify. Head over to the Shopify website. On their home page, you’ll see an area where you can enter your email address to start a free 14-day trial. After typing in your email address, press the Start Free Trial button.

Next, you’ll be prompted to choose a password for your account and your store name as well. When you’ve finished entering in the information, click on the Create your store button.
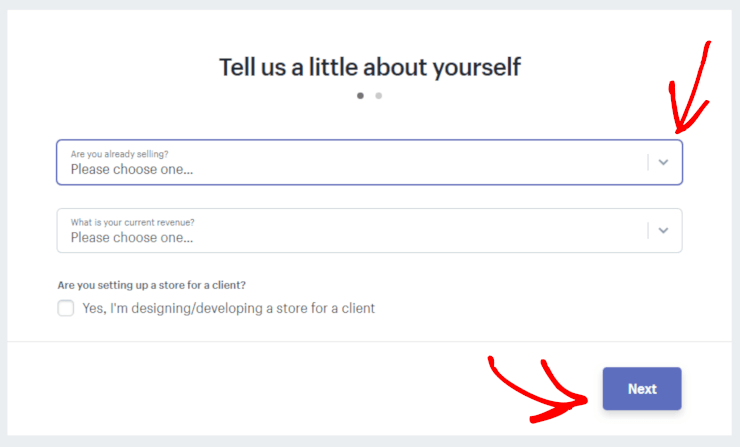
Then, you’ll be asked to answer a couple of questions from Shopify so they can get to know your needs better. Click on the dropdown arrow to choose your answers to the questions and then click Next.
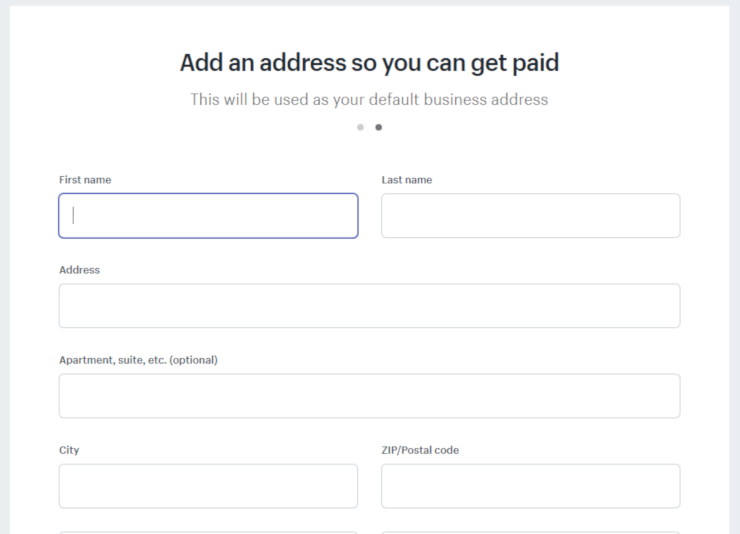
In the next area, you’ll be requested to fill in your name, address, phone number, and website address. When you’ve finished filling out this part, click the Enter my store button at the bottom of the form.
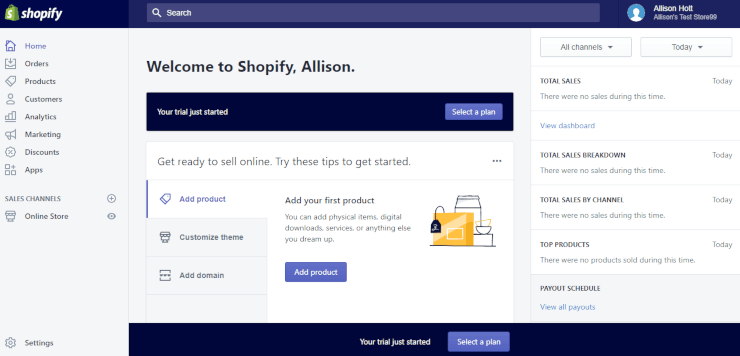
You’ll then be redirected to the home page of your Shopify account. Your Shopify store is now ready for you.
Step 2: Set up Payments and Shipping for Your Shopify Store
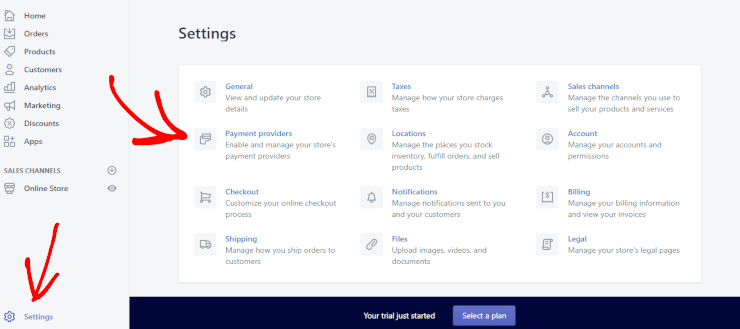
In order to accept payments from customers, you’ll need to set up payments for your Shopify store. To do so, click on Settings in the bottom corner of your home page and then click on Payment providers.
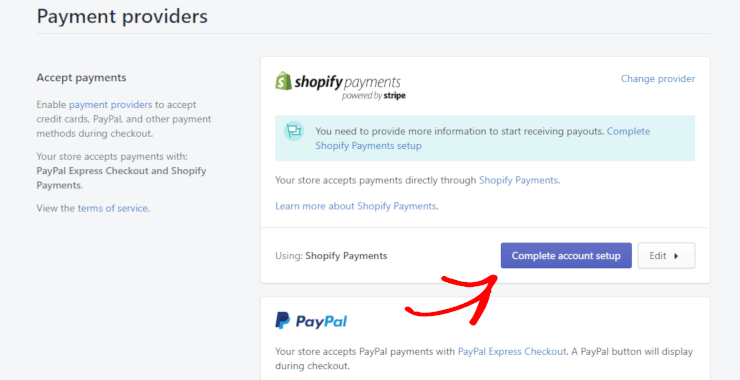
Your Shopify account is automatically set up to receive PayPal payments with PayPal Express Checkout. If you have a PayPal account set up already with the email address you used to create your Shopify account, you should be ready to accept payments. If you don’t have a PayPal account, Shopify will send you an email with instructions on how to set up a PayPal Merchant account to claim your funds.
For the ability to accept other forms of payment from customers like credit cards, you’ll need to click on the Complete account setup button to provide Shopify with more details about your business.
You can also choose to accept alternative forms of payment like BitPay and GoCoin as well.
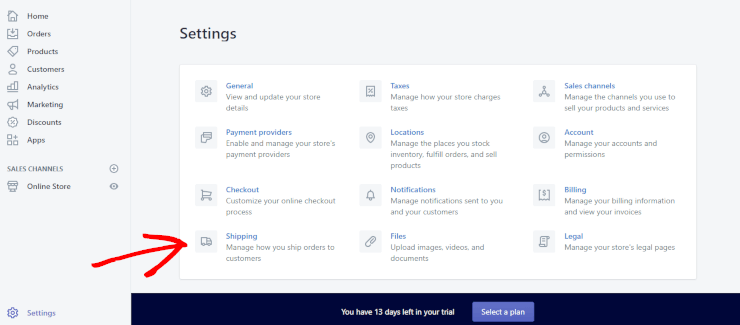
The last step to setting up your Shopify store so it’s ready to start selling is to set up shipping. Click on the Settings button again and then click on Shipping.
By default, the shipping origin will be set to the store address you entered in when setting up your Shopify account. You can edit the shipping origin if you wish by clicking the Change shipping origin button.
In this area, you can also define shipping zones and rates for shipping to those locations. If you don’t know how much to charge for shipping, try contacting your local post office to get some advice.
Step 3: Add Your Products to Shopify
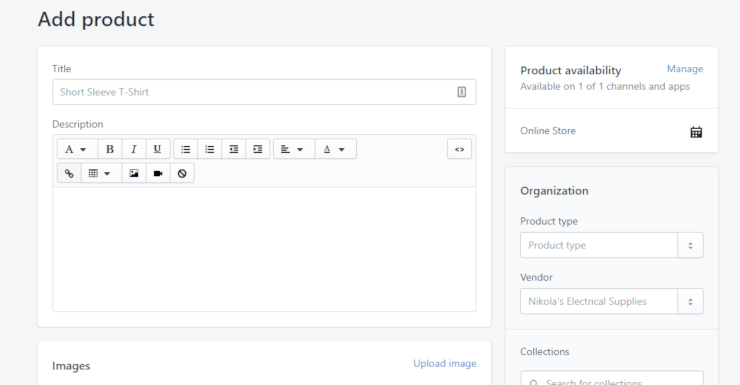
Next, you’ll need to add your Shopify products. To add your products, click on the Products tab in the menu on the right and then click on Add product.

Then fill out all of the information about your product including the name/title of your product, product description, price, and more. Upload a high-quality image of your product here as well. You can also add the product to a collection to make it easier to find in your store. When you’re finished filling in all of the details for your product page, click the Save button.
Repeat this step for all of the products you offer.
Step 4: Choosing Your Shopify Pricing Plan
Now that you’ve got the basics of your Shopify account configured, you’ll have to choose a pricing plan to actually get your online store up and running. Click on the Select a plan button in the banner at the bottom of your screen.
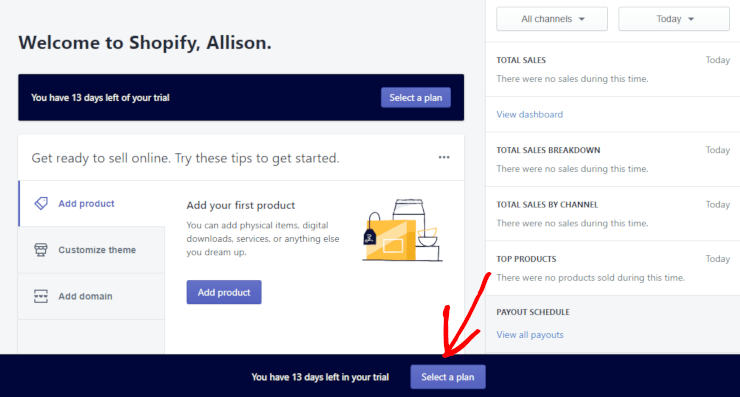
You’ll then be presented with 3 different plan options. If you’re just starting out and new to selling online, we recommend choosing the Basic Shopify plan for $39 per month. You can always upgrade your plan anytime you want if you need more features or if your online store grows quickly. To choose the Basic Shopify plan, click the Choose this plan button.
Then enter your credit card information and press the Start plan button.
Get Started with Shopify Today!
Now you’re ready to start making money online with Shopify and your WordPress site.
Step 5: Using Shopify Buy Button
Now it’s time to integrate Shopify with your WordPress site with Buy Buttons. Buy Buttons link to your Shopify checkout and they’re included in all Shopify plans. Buy Buttons allow you to sell your products on your website or in blog posts. You can also use Buy Buttons to create a checkout link to send to customers in email messages or on social media. Along side email messages a sales CRM tool comes in
handy in managing leads and customer relationships.
If the Buy Button sales channel doesn’t appear in the Sales Channel section of your Shopify admin, you’ll need to add it. To add the Buy Button sales channel, click on Settings and then click on the Sales channels button.
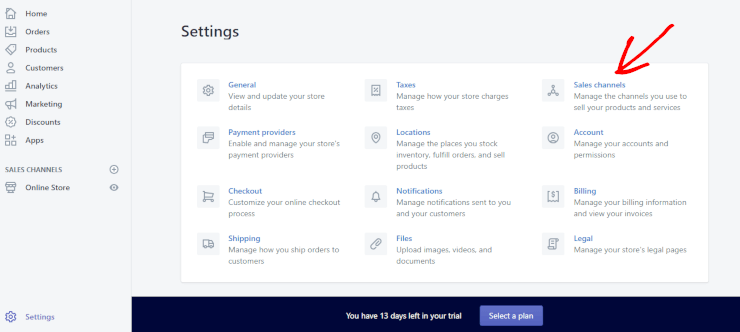
Click on the Add sales channel button. You’ll then see a list of available sales channels, scroll down to find the Buy Button channel. Once you find it, click the blue + button to install.
After installing the Buy Button sales channel, click on the Create Buy Button button.

Next, pick the product you want to create a buy button for and click the Select product button. Now you can configure the look of your Buy Button. You can choose a template, customize the button color and text, and the action that happens when a customer clicks the button. When you’re finished customizing the appearance of your button, click the Generate code button.
The next step is to copy the code and add it to your WordPress site.
Step 6: Add Shopify Buy Buttons to Your WordPress Site
Now we need to add your products to your WordPress site so you can start selling them. Click the Copy code to clipboard button to copy the code you just generated for that product.
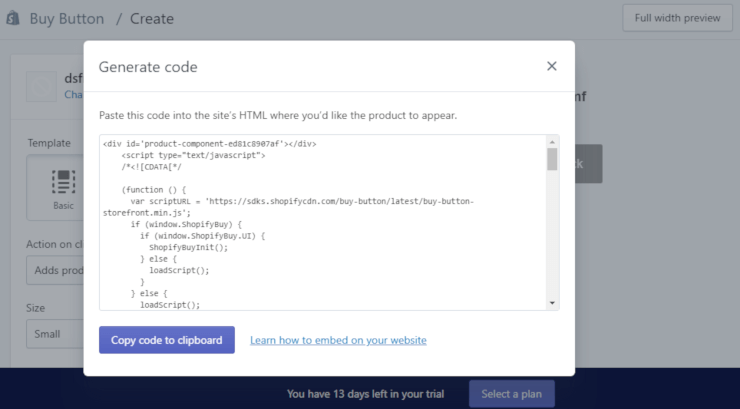
You can paste this code anywhere on your website where you want your Buy Button to appear. For example, you can create a page on your WordPress site to display your Buy Buttons. Create the page on WordPress, name it, and then paste the code.
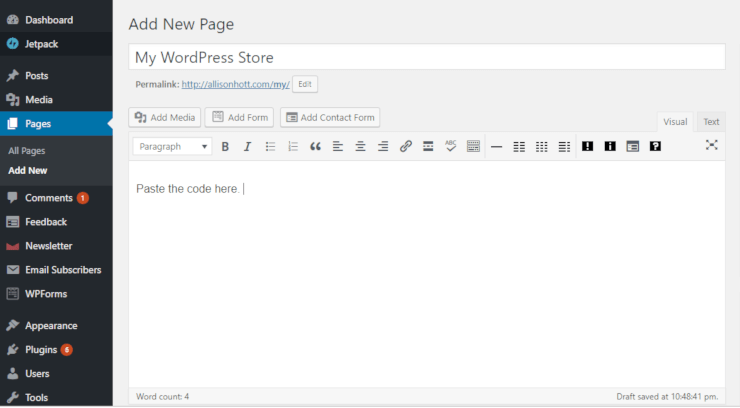
You can also paste the code in blog posts or in your WordPress sidebar.
That’s it! Integrating Shopify with WordPress is that easy. Now that you know how to add Shopify to your WordPress site, you’ll be attracting customers and making a ton of sales in no time.
We hope you enjoyed this article. If you did, take a look at our articles on the Best SEO Tools to Grow Your Website Traffic, Fast!
