Do you want to create a highly profitable online store that’s within budget?
Creating an eCommerce store isn’t as difficult as it used to be. There are lots of platforms that let you set up your store and sell without any prior experience or coding skills.
The trick is to choose the right platform that gives you everything you need without swallowing a huge investment from you.
At SmartWebsiter, we know the ins and outs of eCommerce stores. So we’ve put together this guide to help you learn how to create an online store in just 6 steps.
After that, we’ll give you the right tools and strategies you need to manage, market, and optimize your store for sales and conversions.
Here are the steps you’ll need to take:
- Step 1: Choose an eCommerce platform
- Step 2: Create a website
- Step 3: Configure online store settings
- Step 4: Customize online store
- Step 5: Add recommended website settings
- Step 6: Launch online store
- Manage and market your online store
Before we begin, this guide will show you how to create and run a full-fledged online business.
Having said that, let’s begin.
Step 1: Choose the Right eCommerce Platform
Choosing the right eCommerce platform is a critical step because it’s hard to back out if your decision turns out to be wrong.
eCommerce platforms like Shopify and BigCommerce make it incredibly easy for anyone to sell goods online. You can list both physical and digital goods. There are also platforms like Wix and SquareSpace. But most of these platforms come with a hefty price tag so you’ll need a sizeable investment to get started.
We have a post that breaks down the cost of eCommerce stores so you’ll be clear on the investment you need.
These eCommerce platforms are also fully hosted which means you get lesser control over the design, customization, and management of your site.
There’s another popular platform called WooCommerce that’s absolutely free.
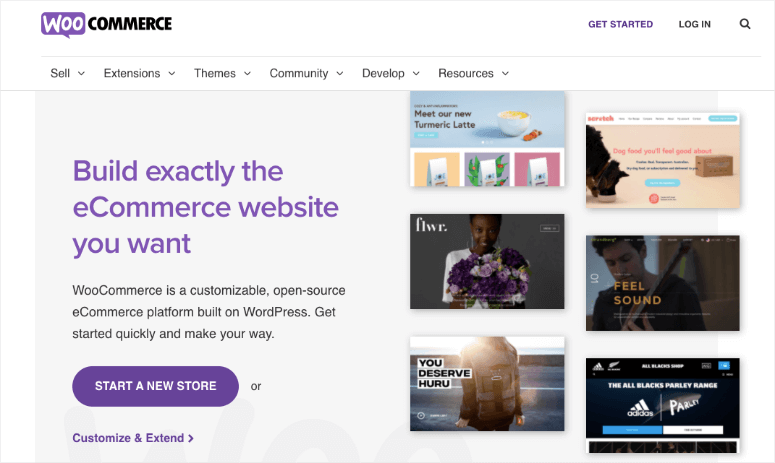
WooCommerce is the best online store builder for WordPress that comes with everything you need to sell products. Plus, there are tons of extensions to add more features and functions to your store.
We recommend WooCommerce as the best platform for any eCommerce store and here’s why:
- Get full control of your site
- Set your own profit margins
- Make your site 100% unique with endless customizations
- Use third-party plugins and extensions
- Most affordable and budget-friendly platform
- No transaction fees
Added to that, the WooCommerce and the WordPress community is humungous, so if you ever run into an issue with your own online store, there are a ton of online communities and forums available to help you out.
However, when you choose this eCommerce solution, there are a few things you need to keep in mind.
- Since it gives you complete control, this also means you have to manage website security, backups, and software updates. But this is a minor setback and there are plugins that you can install that will help you manage it easily.
- As with any other platform, as you scale your small business and add more features to your site, your cost of running the website will increase. This increase in cost won’t come from WooCommerce itself but from other tools you use to run your site.
- Lastly, WooCommerce is an eCommerce plugin for WordPress. This means you’ll first need to create a website on WordPress.org and that’s really easy to set up.
WooCommerce is designed to be flexible so it’s a great choice for entrepreneurs, startups, small and large businesses, and just about anyone who wants to sell online.
Next, we’ll show you how to create a WordPress site in under 5 minutes.
Step 2: Create a WordPress Website
As we just mentioned, WooCommerce is a part of WordPress which is an open-source, self-hosted platform. This means you’ll need to have 3 essential things in order to create your website:
We’ll show you how to get all of them at an unbelievable price so you can get started with your online shop on a small budget. But first, it’s important to know what they are and why you need them.
1. Domain Name
A domain name is the address of your website like www.smartwebsiter.com. Users can type this URL into the address bar of their browser to visit your website.
You can think of it as buying real estate online where you’ll set up shop. The great thing about self-hosting is you’ll get complete freedom to pick a domain name that you want.
Ideally, your domain name should match your business name or atleast something similar. It makes it easier for the customer to find your website and recognize your brand.
So for instance, Apple’s domain is apple.com. But if it were applephone.com, people would still recognize the brand.
Domain names start as low as $0.99 per year and go up to tens of thousands of dollars. It all depends on the value of the name you pick.
For a more detailed explanation, check out our article: What is a Domain Name and How Does it Work?
2. Web Hosting
While the domain name is like your real-estate property, a hosting server is like a brick and mortar store that you use to house everything that belongs to your shop.
A server is where you securely store your website files and data. When a visitor comes to your site, the server will send the data to their browser and display your website to them.
Servers are expensive but you don’t have to buy one. Instead, you can subscribe to a WordPress hosting plan from a web hosting company and they’ll let you rent space on their servers.
You can get an affordable plan from some of the best eCommerce hosting companies. Some hosts even offer plans that are designed specifically for WooCommerce stores. These plans usually cost around $10-20 per month.
3. SSL certificate
When people start visiting your website, data will be passed between your server and their browsers. If a hacker is able to intercept this data, they can misuse it.
To make sure that doesn’t happen, you need to install an SSL certificate. This will encrypt any data sent to and from your website. When you install SSL, you’ll see that your website has a padlock in the address bar and uses https://.
If you’re running an online store, this is a top priority because you’ll be handling sensitive data like customer payment details along with shipping rates and contact information.
You need to make sure your website is secure so that you don’t have a data breach.
You can get an SSL certificate for free with basic encryption using Really Simple SSL but if you want better protection, you can buy a premium certificate with your web host or an SSL provider.
A better way to get these 3 things in one package is through Bluehost. They are the best web hosting provider in the market and are even officially recommended by WordPress.org.

Bluehost has a dedicated plan for WooCommerce. They handle installing WordPress and WooCommerce so your website is ready to be customized right away.
When you buy a WooCommerce hosting plan with Bluehost, you’ll get:
- Free domain for the first year
- Free SSL for the first year
- Pre-installed online website + blog
- Pre-installed Storefront theme
- Dedicated IP address
- Ample server space so your website runs smoothly
- Website traffic analytics
- 1-click payment install
- Customer product reviews
- Email marketing
- Great 24/7 support team
…and more! That’s a whole lot of features in one plan so you won’t need to spend more on getting these essentials from other providers.
As a SmartWebsiter user, you can get a hosting plan for as low as $2.75 per month using our exclusive Bluehost coupon. Since you’ll be starting an online store, we recommend the WooCommerce hosting plan which starts at $9.95 per month.
For more on why we chose Bluehost, see our complete Bluehost review.
After you subscribe to a WooCommerce hosting plan, you can create an account by entering a password. Then log into your account to access your Bluehost dashboard. Here, you can manage your hosting, website files and database, emails, support, and more.
When you log into your account, you’ll be greeted with a popup informing you that WordPress and WooCommerce have been pre-installed. So you really don’t have to worry about any WordPress installation. All you have to do is log into your site using your credentials.
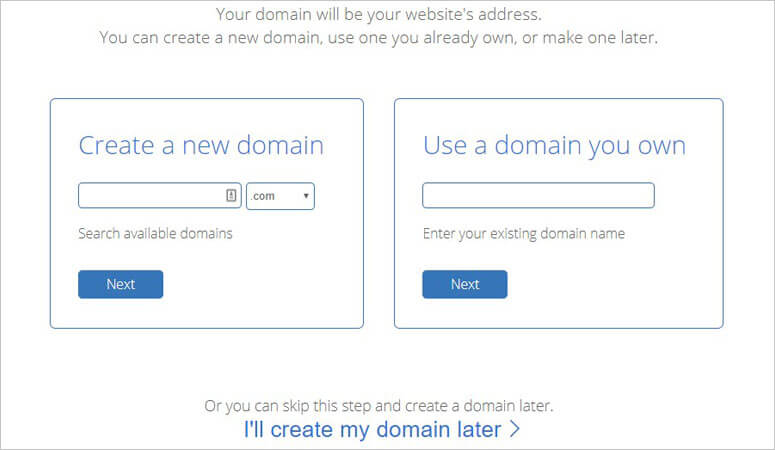
In case you’ve opted for a different hosting plan, no worries. You can easily install WordPress on your own from your web hosting dashboard. We’ll show you how to add the WooCommerce plugin later.
With that, you now have a WordPress website. Now let’s take a look at how to create a successful online store with WooCommerce.
Step 3: Configure Online Store Settings
When you log into your website, you’ll see your WordPress dashboard (also called the wp-admin panel). The first thing you’ll want to do is put your site into Coming Soon mode.
It will hide your website from the public and search engines. This means no one will see your store while it’s under construction.
We recommend using a plugin called SeedProd. From the menu on the left, go to Plugins » Add New page.
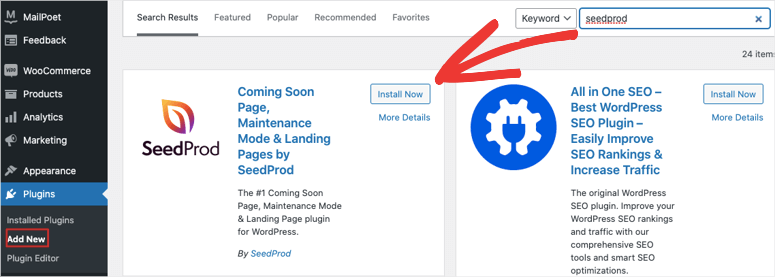
Search for SeedProd and install and activate the plugin. Then SeedProd will appear in your WordPress menu. Open the plugin dashboard and turn on Coming Soon mode.
SeedProd lets you create a unique page to display to anyone who comes to your website.
Now, you can peacefully set up your website behind the scenes. If WooCommerce isn’t installed yet, head over to the Plugins » Add New page. Search for WooCommerce and install and activate the plugin.
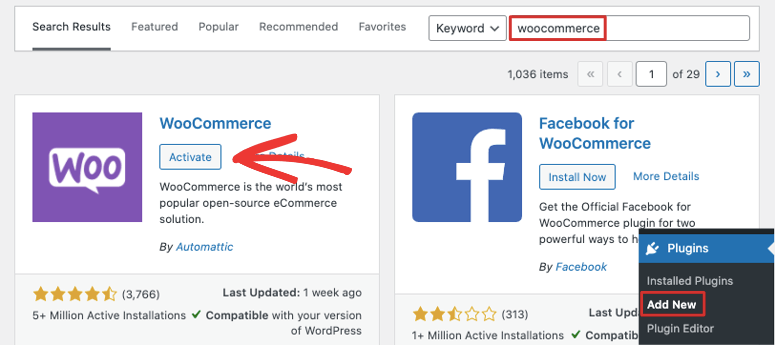
Now, in your WordPress dashboard, there’s a setup wizard you can use to configure your WooCommerce store.
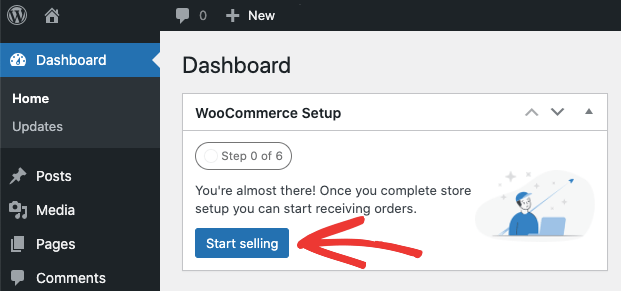
The wizard will ask you to add your company address, industry, product types, and business details. It also asks you if you want to add recommended features to your business. All of these features are free and included with your Bluehost WooCommerce plan so you can choose to install the tools on your site.
Finally, WooCommerce will ask you to choose a theme or continue with the pre-installed theme. You can explore themes by previewing their live demo.
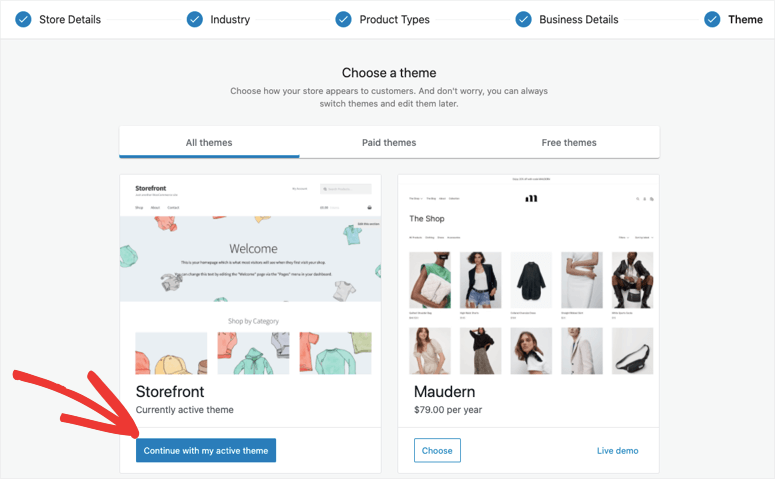
Once you select a theme and activate it, you’ll be redirected to the WooCommerce dashboard on your site where you can start customizing your store.
Step 4: Customize Your Online Store
WooCommerce makes it incredibly easy to customize your online store. In the WooCommerce dashboard, you’ll see a checklist of steps you need to take.
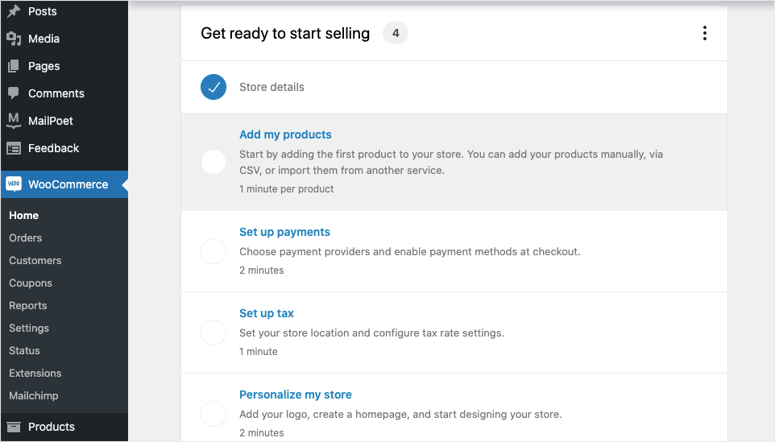
We suggest following this checklist because it will take you through everything you need to set up to properly run your WooCommerce store. That way you won’t miss anything important.
- Add my products
- Set up payments
- Set up tax
- Set up shipping
- Personalize my store
1. Add My Products
You can start by adding your own products to your store. This will give you an option to use a template, create products manually, or import products from a CSV file or another platform. For this tutorial, we’ll show you how to create a product using a template.
The templates available are based on the type of product you want to sell which includes physical, digital, and variable products. We’ll select the Physical product template.
This will let you list your product along with pricing, taxes, shipping, and other details that you’ll need to sell a physical product. If you plan on selling digital products like eBooks, music downloads, and so on, you won’t need these settings so you can select the Digital Product template.
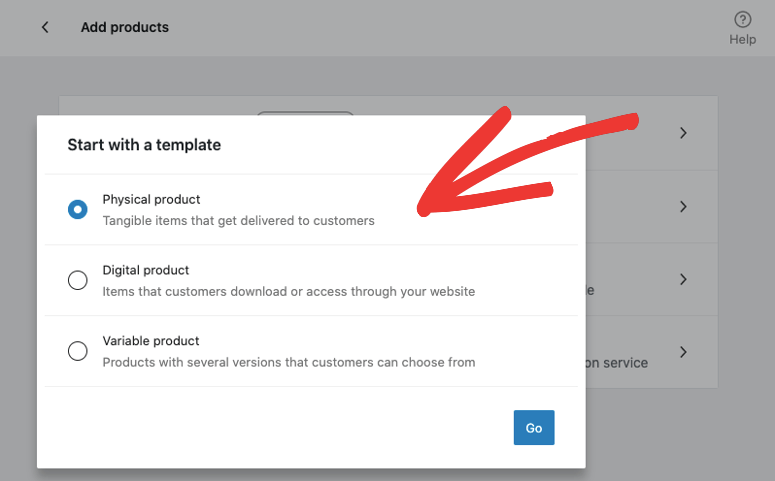
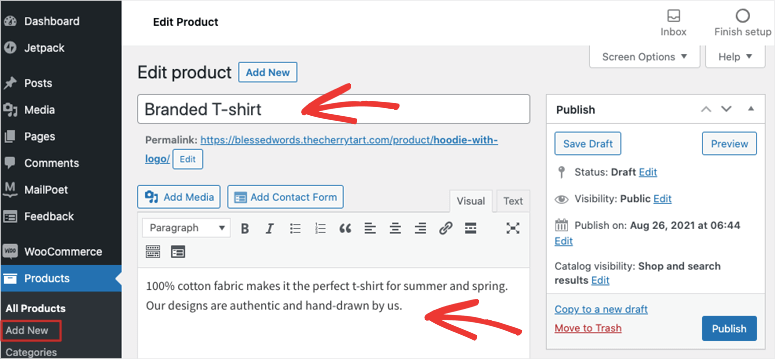
When you click on the ‘Go’ button, you’ll be taken to the product editor. For future reference, you can create new products by navigating to the Products » Add New page from your WordPress menu on the left.
On this page, first, you can add a product image, name, and description.
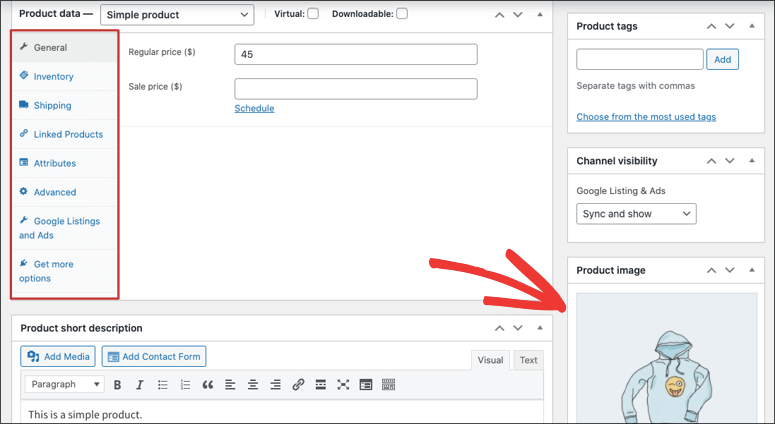
When you scroll down the page, you’ll see a Product Data section. This lets you add product descriptions and details like:
- Pricing
- Inventory
- Shipping
- Linked Products
- Attributes
- Advanced settings
- Google Listings and Ads
There’s also a tab ‘Get more options’ to add more extensions to increase functionality. For instance, you can add an extension for frequently bought items. Then you can tag products together so they show up under the ‘Frequently Bought Together’ section in these tagged product pages.
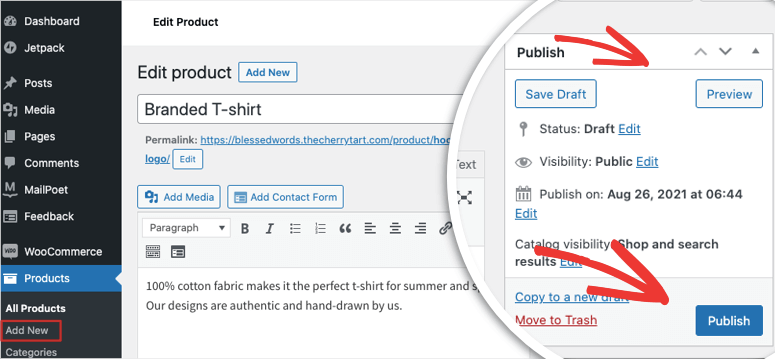
Next, in the right menu, you can add an image for your product listings, tags and categories, and more. When you’ve added all your product details, you can preview the product page to see how it would look.
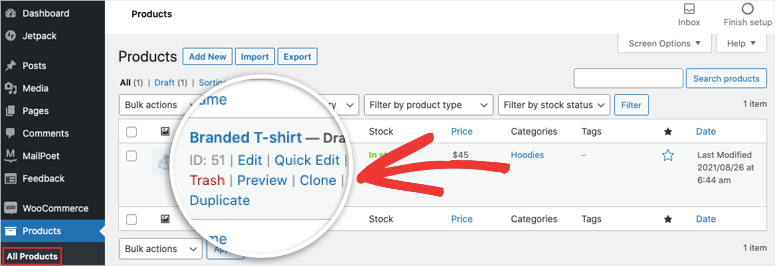
All that’s left to do is hit the ‘Publish’ button and your product will be added to your site.
Keep in mind that you can always come back and make edits to your product. On the All Products page, you’ll see a list of all the products you create. You can choose to edit, preview, duplicate, or trash it.
Now you know how to add products and customize them. To access the WooCommerce setup checklist, you can head back to the WooCommerce » Home page.
Now you’ll see that the ‘Add my products’ task has been completed.
Next, you can add payment options so customers can make online payments.
2. Set Up Payments
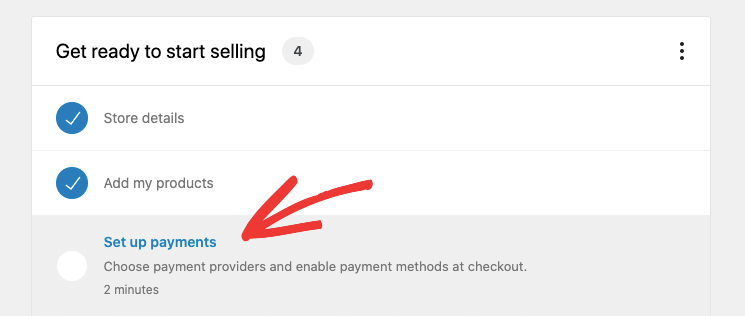
When you click on the ‘Set up payments’ tasks, you’ll see all the available payment options.
WooCommerce lets you connect to a long list of payment processors including Stripe, PayPal, PayU, and Razorpay. You can even accept direct bank transfers and cash on delivery.
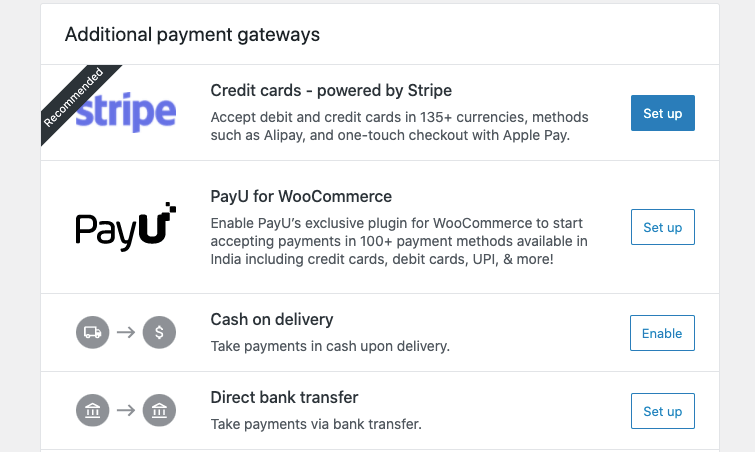
See how user-friendly WooCommerce is? You simply need to select the one you want and follow the onscreen instructions to set up the gateway.
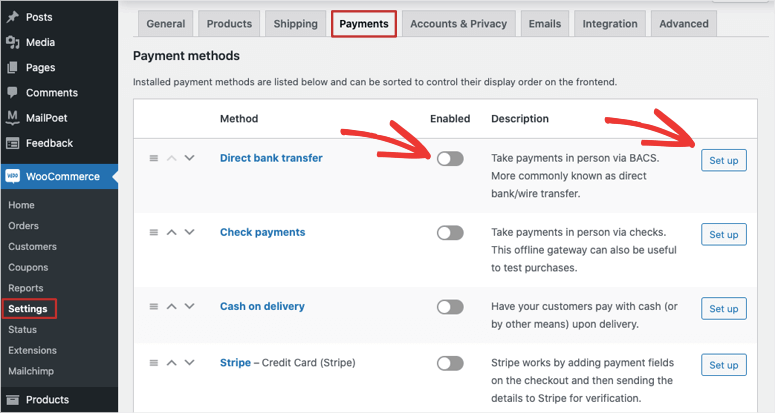
Next time you want to enable a new payment option, you can do it under the WooCommerce » Settings » Payments tab.
Next, we’ll show you how to add tax, shipping, and other customizations.
3. Set Up Tax
In the setup guide on the WooCommerce home page, you can now set up your tax rates to be auto-applied to every order on the checkout page. If you don’t add taxes, you can open this task and say I don’t charge sales tax.
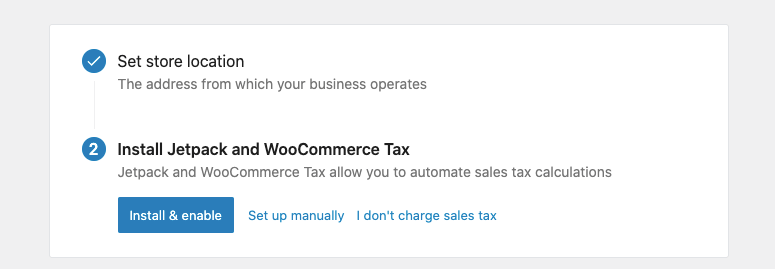
If you do, you can set it up manually or choose to install the Jetpack and WooCommerce Tax plugin. This helps you easily manage your taxes upfront.
We’ll show you how to set it up on your own. Click on the set up manually option here.
Now you can add your tax details like country, state, and zip code. Then you can add your tax rate and name like sales tax or GST.
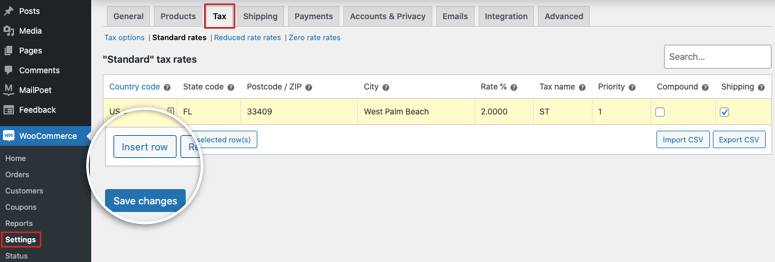
Save your changes to store your tax rate. You can access this page again by navigating to WooCommerce » Settings » Tax page.
4. Set up Shipping
Now to offer different shipping methods, head back to the setup guide and click on the Set up shipping task. On the next page, you can add a zone name to identify the shipping region.
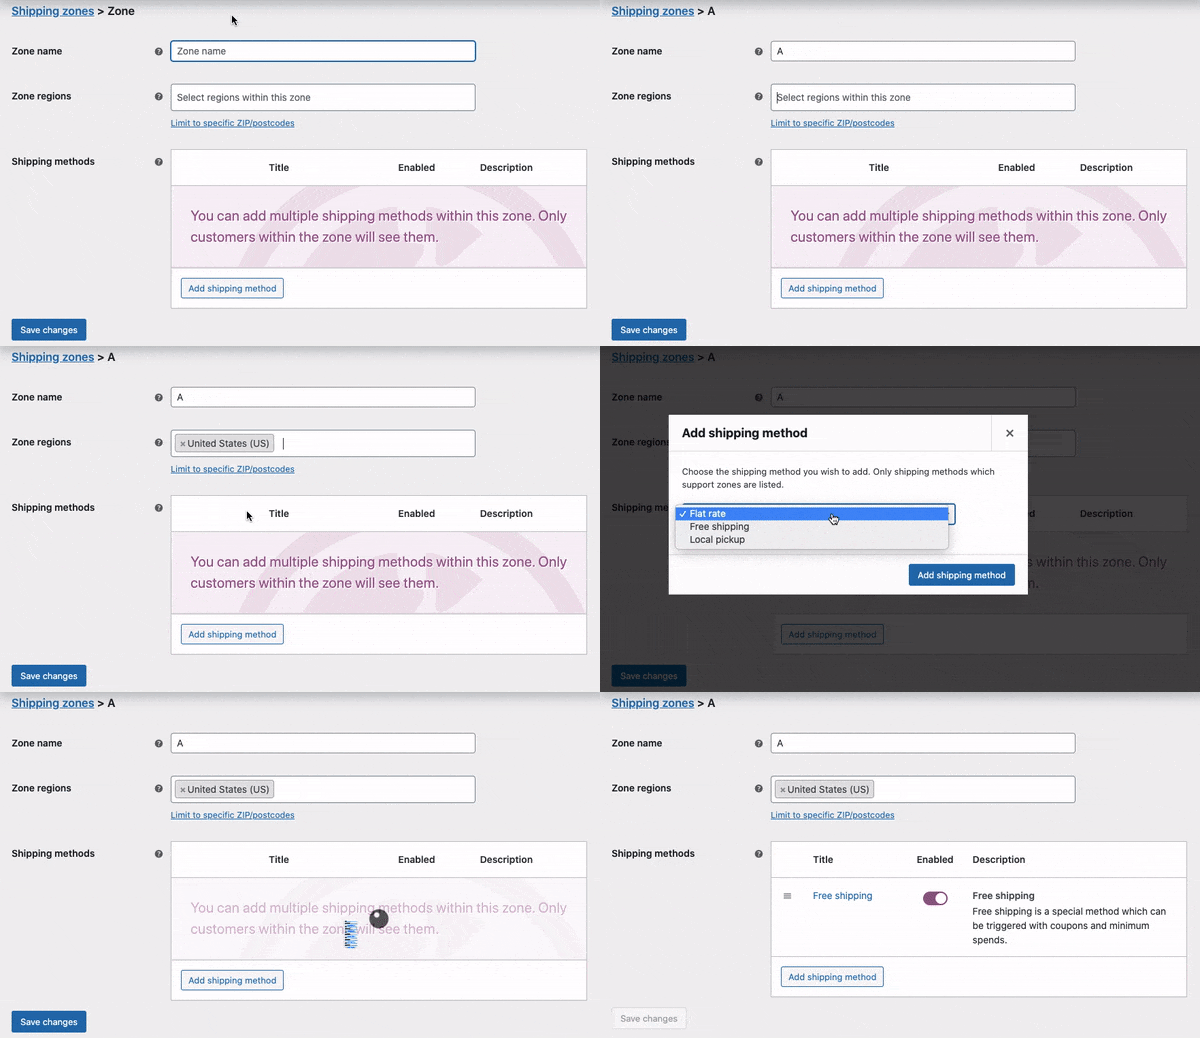
In the Zone regions field, there’s a dropdown menu of all countries and states available according to your store’s location. You can choose the regions to which you ship and then select the shipping method:
- Flat rate
- Free shipping
- Local pickup
After choosing the one you want, hit the Save changes button to store your shipping methods. Now when you visit your store, select a product, and check out, you’ll see the tax, shipping, and payment gateway options available.
With that, you’ve completed configuring the major part of your online store. Now all that’s left to do is personalize it to match your brand style.
5. Personalize My Store
Back on the setup guide page, you’ll see the last task in the checklist is to personalize your store.
This will let you create a custom homepage, upload a logo, and even set a store notice.
You can use this notice space to say you offer “free shipping on every order” or “now open for orders”. These notices can get the attention of the visitor and encourage them to buy.
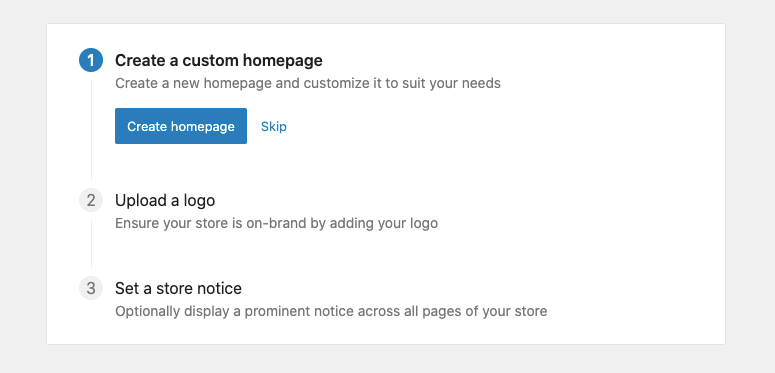
Once you create a homepage here, you’ll need to edit it. To do that, navigate to Pages » All Pages tab.
Find your homepage and edit it.
You can use the WordPress block editor to edit the page. But this can be tricky especially if you’re new to WordPress.
We recommend using a page builder like Beaver Builder or Elementor. They let you edit your page from the front end.
This means you’ll see a live preview of your page that you can directly make changes to. You can drag and drop elements of your page to where you want it to appear. You can also click on any text and enter your own.
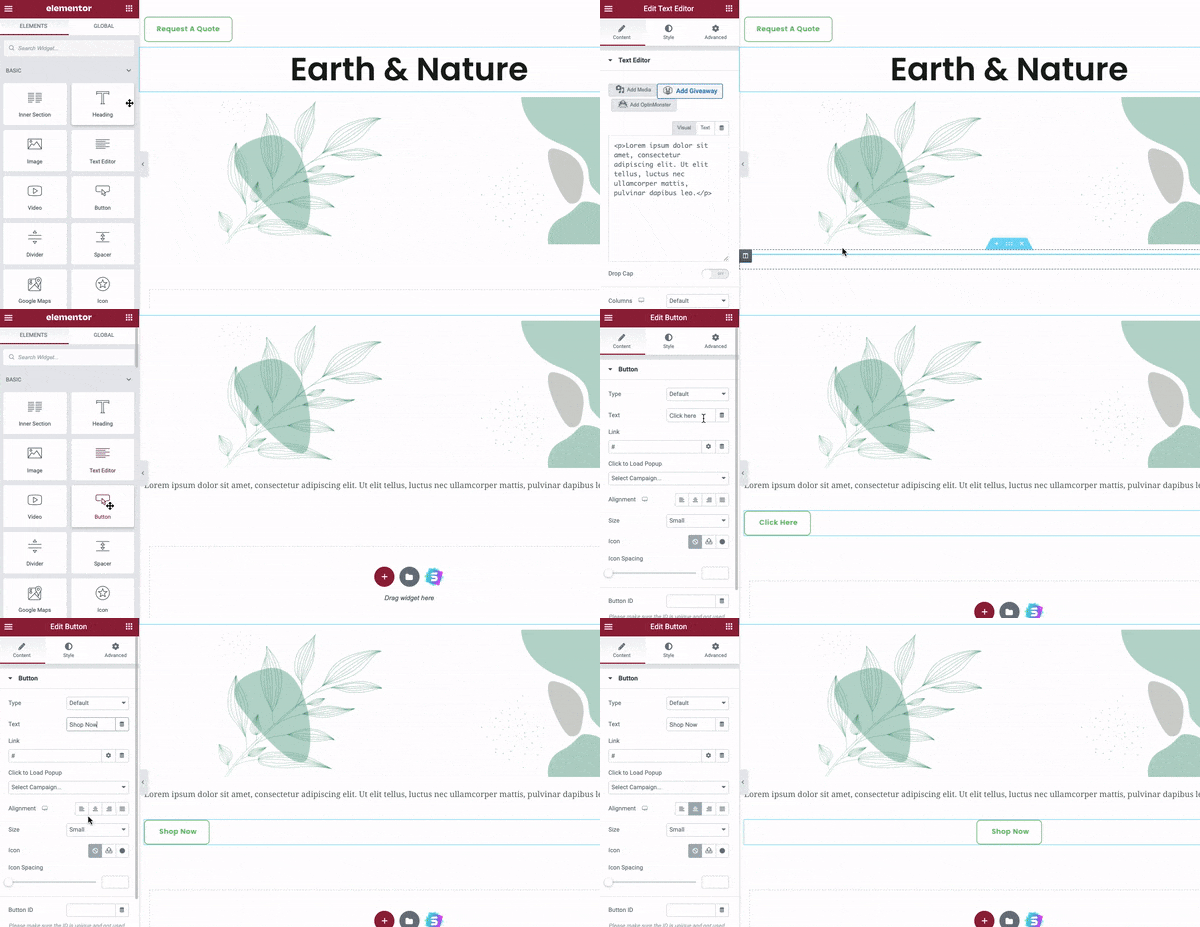
These builders ensure your pages are responsive so they look great on any device. Plus, you can preview your eCommerce site as it would look on mobile and make mobile-only changes.
We have a detailed step by step guide that you can follow to fully customize your online store.
With that, your store is set up and personalized. In the WooCommerce setup guide page, you’ll see more tasks of things to do next. Some of them are to sign up for newsletters, updates, and extensions. We’ve listed out the ones that will help you with your store:
- Set up Google Listings & Ads
- Learn more about variable products
- Design your store
- Set up refund and returns policy page
WooCommerce gives plenty of instructions every step of the way so we won’t dive into detail here.
Up next, we’ll focus on recommended measures for WordPress sites to make sure your site functions perfectly.
Step 5: Adding Recommended WordPress Settings
If you’re new to WordPress, there are a few settings that you should know about. This will take care of the minute details but will make a huge difference to your store.
1. Make Sure the Site is Secure with HTTPS
Your hosting plan came with a free pre-installed SSL certificate, but you need to make sure your site is using it.
From your WordPress menu, head over to the Settings » General tab. First, you can add a site title and tagline if it isn’t already filled out.
In the WordPress Address and Site Address fields, make sure your website is using https:// here.
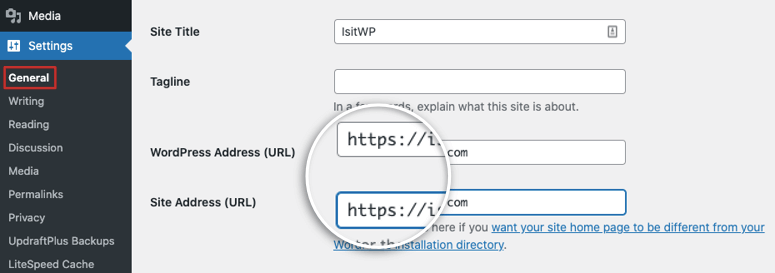
Don’t forget to save your changes to store these settings.
2. Create a Blog Page
Every eCommerce business needs a blog to establish its online presence. By integrating a blog with your store, you can drive traffic to your store, keep shoppers engaged, and build a trusted brand.
In the left-hand menu of your WordPress dashboard, go to the Settings » Reading page.
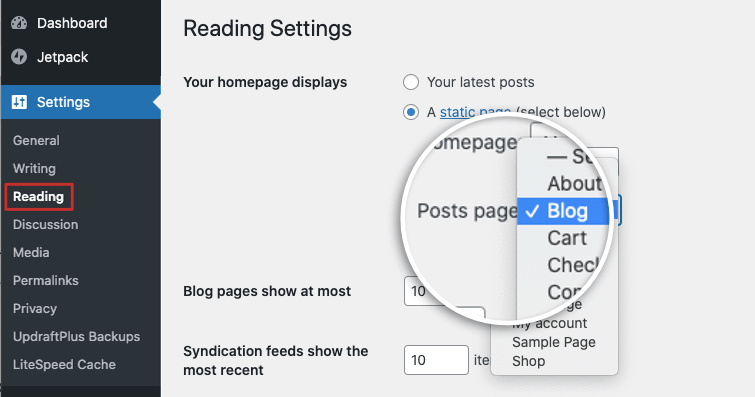
Here, open the Posts page menu and choose Blog from the dropdown. This creates a page to showcase every blog post you publish.
To write your first blog post, head over to Posts » Add New. This will open the WordPress block editor. You can add a title and start writing your content inside the post editor.
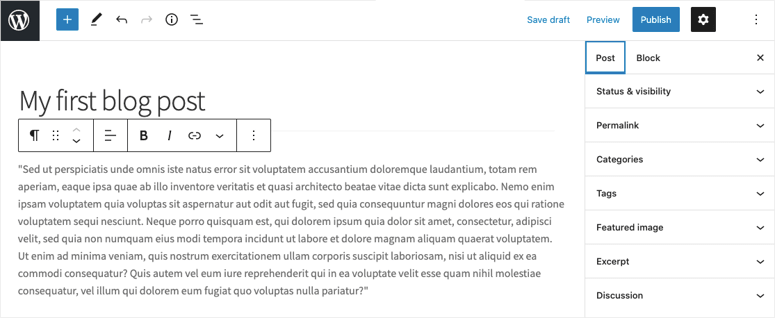
When you’re ready, you can preview your post and then publish it. All the posts you publish will appear together on your blog page.
3. Add a Navigation Menu
Your navigation menu sticks to the top of your website, so visitors can easily find the most important pages and links.
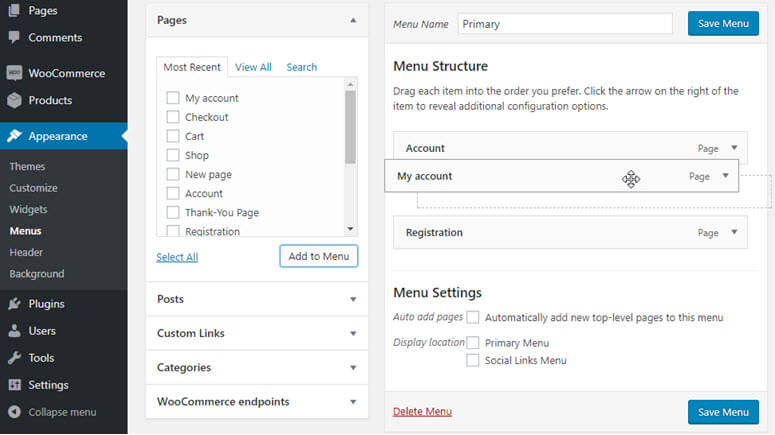
Most themes come with a premade menu. You can add a new one or customize the existing one under the Appearance » Menus tab.
In this page, you can add your own Menu Name field and click Create Menu.
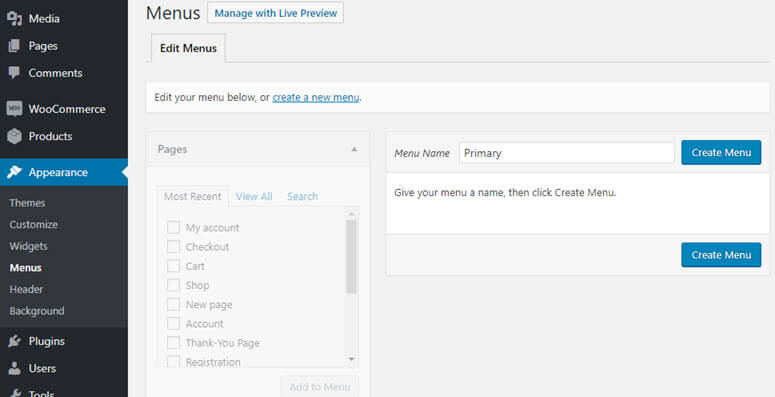
You can now choose from your existing pages, posts, custom links, and categories. After selecting an item, click the Add to Menu button.
4. Add and Customize Widgets
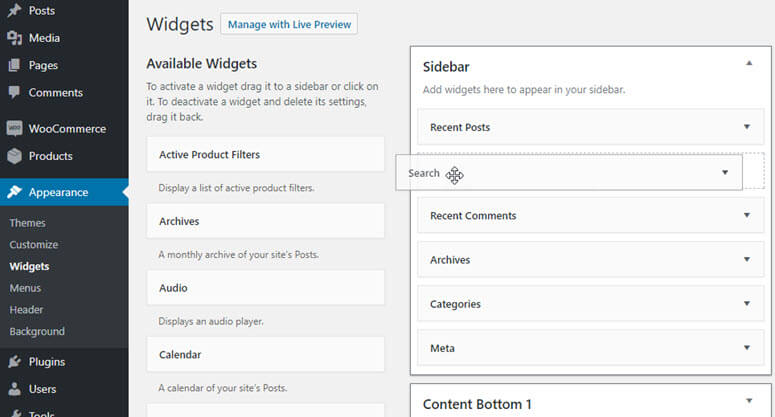
WordPress lets you control what’s displayed in your sidebar and footer.
You can add the latest posts, social media buttons, Facebook feeds, testimonials, and so on. If your WordPress theme has support for footer widgets, then you can use it to add copyright notices, links, and more.
Go to Appearance » Widgets to view the available widgets. Next, you need to drag the ones you want and drop them into your sidebar or footer menu.
You can then drag and drop menu items to rearrange the order. Make sure you save the menu changes when you’re done.
5. Set Up a Static Homepage
By default, WordPress shows your blog’s latest posts as your homepage instead of a static page. Your WordPress theme may override these settings on its own.
To make sure your website is displaying your homepage correctly, go to the Settings » Reading page.
In the Your Homepage displays section, choose ‘A static page‘. Then from the homepage dropdown menu, choose the page you want to display as your front page.
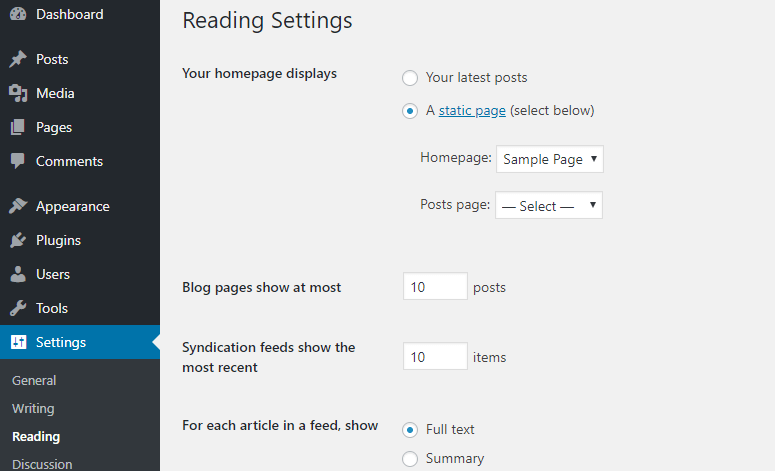
Every time you make changes like this, make sure you save them.
And that’s it! Your WooCommerce store is officially ready to launch!
Step 6: Launch Your Online Store
Before you launch your store, we recommend previewing your website and making sure everything works perfectly fine.
At the start of this tutorial, you used SeedProd to hide your website. To launch the site, all you have to do is head over to the SeedProd page in your wp-admin panel.
Now use the same toggle switch to disable Coming Soon mode here.
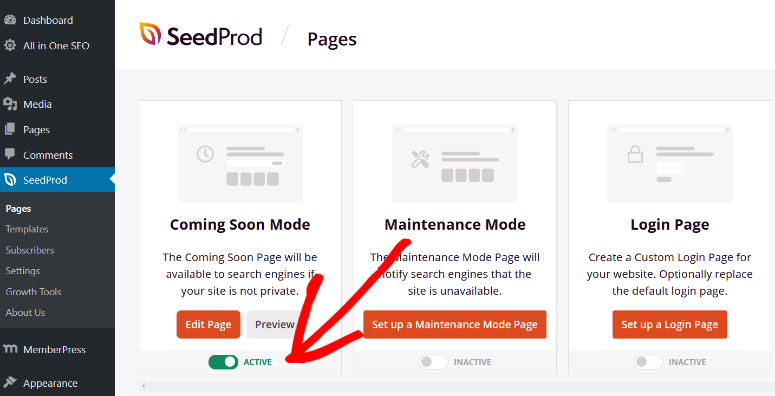
SeedProd will remove the coming soon page and your online store is officially launched! And that’s a big deal so congratulations!
By launching an online store, you’ve crossed a huge milestone. Next, you need to market, promote, and manage your store correctly in order to stand out from the crowd and be successful.
We’ll show you the best tools and strategies you can use to make your WooCommerce store a success.
The Best Ways to Manage and Market Your Online Store
To successfully market and manage an online shop, you would usually need to hire professionals.
But with WooCommerce, you get access to so many free and paid eCommerce plugins and addons that make it easy to handle it alone or with a small team.
Just like WordPress themes, you can easily find and install free plugins from the WordPress plugin repository.
All you have to do is visit Plugins » Add New page. Use the search box in the right corner to find a plugin and click the Install Now button. Then you’ll see an option to Activate the plugin.
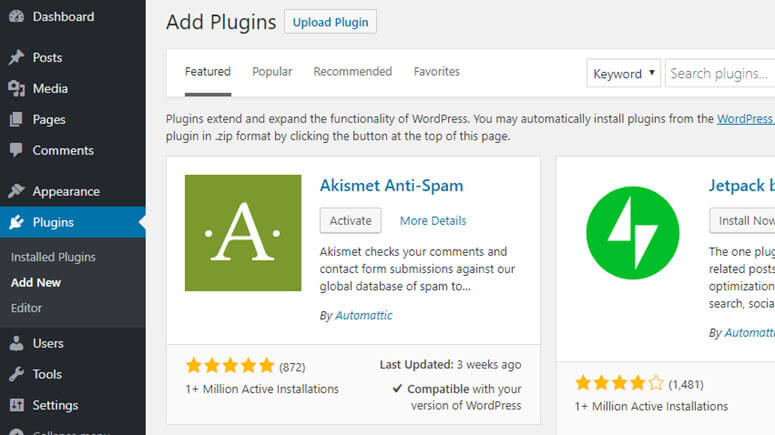
You can also buy or subscribe to plugins and services from third-party vendors. We recommend making sure you use trusted tools so that you don’t invite hackers through malicious software.
Here are our top picks of essential free and paid plugins that every online store should use. All of these plugins are reliable, tried and tested, and actually produce great results.
We’ve given you a brief look at each plugin below but you can read more about them in our complete list of the best WordPress plugins.
1. OptinMonster – Increase sales and reduce shopping cart abandonment

OptinMonster is the #1 conversion optimization tool to convert your visitors into customers and get higher sales.
You’ll get access to campaign types like popups, floating bars, slide-ins, coupon wheels, and inline forms. Plus, you can add powerful targeting features based on a shopper’s interest, behavior, location, device, and much more.
Features:
- Ease of use with templates and a drag and drop builder
- Advanced campaign triggers and targeting rules
- Yes/No and 2-step optin popups
- Built-in analytics and A/B testing to optimize results
- High speed and performance so it won’t slow down your site
Cost: OptinMonster starts at $9 per month.
2. WPForms – Create all the forms your website needs
When you run an online store, you’ll need to build a lot of different online forms, such as contact, review, survey, registration, and login forms.
The best way to create all these forms for your site is by installing the WPForms plugin.
WPForms is the #1 form builder for WordPress. It comes with 1,200+ templates and a powerful drag and drop builder to create any form you need. You can add forms to your site in under 5 minutes.
Features
- 1,200+ built-in form templates
- Integrations with your favorite apps
- Custom registration and login forms
- Reduce form abandonment
- Built-in anti-spam protection
Cost: There’s a free and paid version. The premium plugin starts at $49.50 per year.
3. All in One SEO – Easiest way to drive traffic to your store
The best way to get people to visit your store is by appearing on search engines when someone searches for what you’re selling.
Search engine optimization helps you get your products or blog content to rank on Google, Bing, or other search engines to get maximum visibility for your store.
The easiest way to improve the SEO of your online store is by installing the All in One SEO plugin.
It lets you add all recommend SEO measures at the click of a button. It comes with recurring site audits, content research, backend analysis, SEO error detection, and much more.
It also gives you advanced eCommerce SEO support to optimize your product pages and product categories.
Features:
- Site audits
- Full site redirects
- On-page SEO checker
- Headline analyzer
Cost: Starts at $49.50 per month.
4. MonsterInsights – Understand your audience

MonsterInsights is the best Google Analytics plugin for WordPress. It gives you all the statistics and data you need to understand what your audience likes and doesn’t like.
You can set it up in minutes and then access your website reports straight from your WordPress dashboard.
You can track your forms, eCommerce revenue, and overall site performance. MonsterInsights also helps you find top-performing pages, products, and custom events to improve your marketing strategy and boost campaigns.
Features:
- Universal website tracking across devices and campaigns
- Enhanced eCommerce tracking
- Real-time user stats
- Set up custom dimensions to track authors, categories, tags, searches, and more
- Integration with popular plugins and services including MemberPress, Yoast, and WPForms
Cost: The lite version is free. The Plus subscription starts at $99.50 per year.
5. SeedProd – Build dedicated landing pages

A successful eCommerce website requires many different pages. There are sales pages, squeeze pages, thank you pages, maintenance mode pages, 404 pages, login pages, and many more.
SeedProd is the best landing page builder for WordPress to create stunning, optimized landing pages for your site. With the drag and drop builder, you can create beautiful pages and layouts in minutes, with no coding required.
Features:
- Library of landing page templates
- Smart sections
- Email optin forms, countdown timers, giveaways, testimonials, social profiles, and much more.
- WooCommerce integration
Cost: Free version available. Paid plans start at $39.50 per year.
6. TrustPulse – Build confidence and trust in customers

TrustPulse is the best social proof notification plugin for WordPress. It helps you build trust and confidence with your target audience to maximize sales. In fact, this tool has been proven to instantly lift conversions by up to 15%.
TrustPulse works by tracking recent sales and other activity on your site. It then displays this activity in non-intrusive popups for others to see.
When new visitors see others taking action on your site, like buying a product or signing up for newsletters, it encourages them to do the same.
Features:
- Real-time activity tracking
- Multiple popup types like recent activity, group statistics, and custom messages
- 100% customizable popups and flexible design options
- Smart targeting rules
- Stats and analytics to monitor your campaigns
Cost: Starts at $5 per month.
7. Constant Contact – Engage shoppers and build relationships

Constant Contact is a popular email marketing service and website builder for bloggers, business owners, marketers, and more. It lets you create and send targeted emails to your audience.
Constant Contact helps you set up autoresponders and drip email campaigns so you can automate your email marketing. You’ll also find tons of design options to customize colors, fonts, images, and more to suit your branding and other content.
Features:
- 240+ pre-built email templates
- Drag-and-drop builder
- Email marketing automation
- Email list segmentation
- User data and analytics
Cost: Starts at $9.99 per month.
8. JetPack Backups – Backup your site to be safe

It’s absolutely necessary to take regular backups of your website. With any website, things can and will go wrong. Your site can crash, malfunction, or get hacked.
The best solution for eCommerce stores is to use a backup plugin like JetPack Backups. It is one of the best backup plugins for WooCommerce stores.
It backs up your site in real-time so you never lose any orders or customer data. And it lets you restore your site to any past state while keeping all orders and products up to date.
Features:
- Incremental backups that can be done manually or be scheduled
- Plenty of addons to extend functionality
- Secure storage options
- Restore backups from your control panel
- Cloning and migration
Cost: The basic version is free. Premium plans start at $42 per year.
9. Sucuri – Secure your website from hackers
Big or small, hackers target every site that exists. With an eCommerce website, you’ll be handling sensitive data like payment details, shipping, and contact info. It’s a top priority to ensure there are no data breaches or malware attacks.
Sucuri is a complete website security solution that you can use to protect your online store from malware, brute force attacks, and other potential vulnerabilities.
Once you activate Sucuri, it scans all your incoming traffic and makes sure only genuine traffic comes to your site. It also gives you access to clean up your site quickly in case it gets hacked.
Features
- Monitors your website every 4 hours
- Robust firewall
- Maintains an activity log
- Server-side scanning
- Recommended security settings
We recommend using our comprehensive security guide to make sure your website is completely protected.
Price: $199.99/year
10. WP Rocket – Make your website lightning fast

Speed is everything when it comes to selling services and products online. Visitors expect your website to load in 3 seconds or less otherwise, they bounce to a competitor or alternative.
Moreover, your checkout process needs to be smooth and as fast as possible.
WP Rocket is the most popular premium caching plugin for WordPress. When you install the plugin, it will automatically add all the recommended measures to your site. This will improve your site’s speed instantly.
Features:
- Easy set up and configuration
- Immediate speed results
- Automatic exclusion of conflicting pages
- Compatible with popular eCommerce plugins
Price: WP Rocket is a premium plugin for WordPress websites. It starts at $59 for a single site license.
Those are our top recommended tools to manage and market your website. You can choose the best plugins for your site accordingly to your business plan.
With that, you’ve learned to set up an online store and run it successfully.
